Show List
Angular Directives
Angular directives are used to change the style or behavior of the DOM element. Below is the classification of directives. There are two types of directives built-in and custom which are further classified as below.

Built-in directives
- Component Directives: Angular components are also directives as they are used to change the DOM element.
- Structural Directives: Used to add or remove DOM element. Examples *ngIf, *ngFor, *ngSwitch. These begin with *
- Attribute Directives: Used to change style or behavior of element. Example ngStyle, ngClass, ngModel.
Custom Directives
You can create your own directive and add custom behavior.
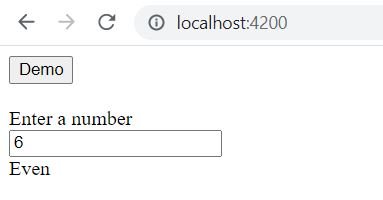
*ngIf
Used to add or remove HTML element based on an expression.
home.component.html
<button (click)="showMsg()"> Demo </button><br><br>Enter a number<br><input type="text" [(ngModel)] ="firstNum" ><br><div *ngIf='firstNum % 2 == 0'> Even</div>
home.component.ts
import { Component, OnInit } from '@angular/core';@Component({selector: 'app-home',templateUrl: './home.component.html',styleUrls: ['./home.component.css']})export class HomeComponent implements OnInit {firstNum: number = 0;constructor() { }ngOnInit(): void {}showMsg() {alert("Event Triggered")}}
Output
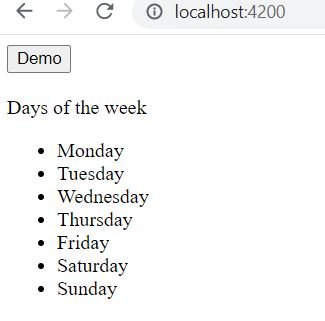
*ngFor
It is used to display a list of elements.
home.component.ts
import { Component, OnInit } from '@angular/core';@Component({selector: 'app-home',templateUrl: './home.component.html',styleUrls: ['./home.component.css']})export class HomeComponent implements OnInit {firstNum: number = 0;daysOfWeek = ["Monday", "Tuesday", "Wednesday", "Thursday", "Friday", "Saturday", "Sunday"];constructor() { }ngOnInit(): void {}showMsg() {alert("Event Triggered")}}
home.component.html
<button (click)="showMsg()"> Demo </button><br><br>Days of the week<ul><li *ngFor="let day of daysOfWeek"> {{day}} </li></ul>
Output:
*ngSwitch
This is used to add/remove the DOM element similar to a switch statement.
home.component.ts
import { Component, OnInit } from '@angular/core';@Component({selector: 'app-home',templateUrl: './home.component.html',styleUrls: ['./home.component.css']})export class HomeComponent implements OnInit {ticketsCost: any[] = [{ destination: 'Florida', cost: 800 }, { destination: 'Las Vegas', cost: 600 }, { destination: 'New York', cost: 200 }, { destination: 'Texas', cost: 200 }];selectedTripCost: number = 0;constructor() { }ngOnInit(): void {}showMsg() {alert("Event Triggered")}}
home.component.html
<button (click)="showMsg()"> Demo </button><br><br><select [(ngModel)]="selectedTripCost"><option *ngFor="let item of ticketsCost;" [value]="item.cost">{{item.destination}}</option></select><div class='row' [ngSwitch]="selectedTripCost"><div *ngSwitchCase="'200'">Looks Good</div><div *ngSwitchCase="'600'">Will think about it</div><div *ngSwitchCase="'800'">Too Expensive</div><div *ngSwitchDefault>What are the options</div></div>
Output:
ngStyle
Used to set the the style dynamically.
Syntax:
- <div [ngStyle]="{'background-color':'black'}"></div>
- <div [ngStyle]="{'background-color':time.window === 'Night' ? 'black' : 'white' }"></div>
- <div [ngStyle]="{'color':getMyColor(time.window)}"></div>
ngClass
It is used to dynamically apply one or more classes to an HTML element.
Syntax:
- <div [ngClass]="['ClassA', 'ClassB']"></div>
- <div [ngClass]="time.window === 'Night' ? 'ClassBlack' : 'ClassWhite'"></div>
- <div [ngClass]="{'color':getMyColor(time.window)}"></div>
Custom Directive
Custom directive can be generated using Angular CLI command
ng generate directive directiveName
 PS C:\Users\mail2\Downloads\angular\first-application> ng g d myDirective
CREATE src/app/my-directive.directive.spec.ts (245 bytes)
CREATE src/app/my-directive.directive.ts (151 bytes)
UPDATE src/app/app.module.ts (542 bytes)
my-directive.directive.ts
Below is the default code of the generated directive TypeScript
import { Directive } from '@angular/core';@Directive({selector: '[appMyDirective]'})export class MyDirectiveDirective {constructor() { }}
update it to below. This will now update the background color to yellow for the element on which this directive is applied.
import { Directive, ElementRef } from '@angular/core';@Directive({selector: '[appMyDirective]'})export class MyDirectiveDirective {constructor(private el: ElementRef) {this.el.nativeElement.style.backgroundColor = 'yellow';}}
The directive gets registered in the appModule so that other components can access it.
app.module.ts
import { NgModule } from '@angular/core';import { FormsModule } from '@angular/forms';import { BrowserModule } from '@angular/platform-browser';import { AppComponent } from './app.component';import { HomeComponent } from './home/home.component';import { MyDirectiveDirective } from './my-directive.directive';@NgModule({declarations: [AppComponent,HomeComponent,MyDirectiveDirective],imports: [BrowserModule,FormsModule],providers: [],bootstrap: [AppComponent]})export class AppModule { }
home.component.html
Using the directive
<button (click)="showMsg()"> Demo </button><br><br><div appMyDirective>Test</div>
Output
Source Code:
https://github.com/it-code-lab/angular-application
Leave a Comment