Show List
Tutorials > Spring Cloud > Sample Cloud Application Using Spring Cloud, API Gateway, DynamoDB, JWT Authentication, RabbitMQ - Part1
Sample Cloud Application Using Spring Cloud, API Gateway, DynamoDB, JWT Authentication, RabbitMQ - Part1
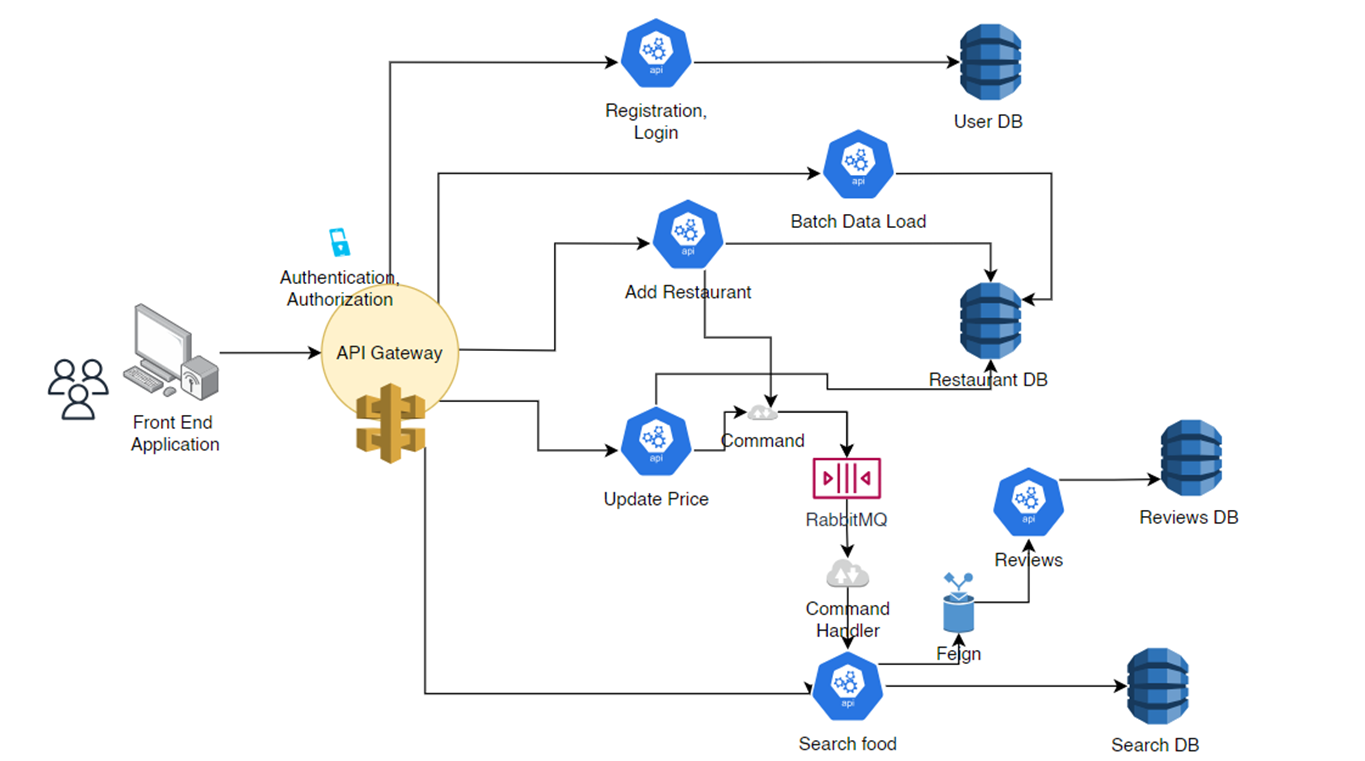
This Food Delivery demonstration Application is an application based on Spring Boot microservices. It enables administrators to effectively manage restaurants and menus, while allowing customers to register and search for food items. This application adheres to SOLID principles and follows a microservices architecture. It seamlessly integrates with DynamoDB for data storage, RabbitMQ for implementing CQRS, and leverages various Java collections and stream APIs. The REST endpoints are documented using Swagger, and the search functionality is optimized for filtering, sorting, and pagination. To expose all the REST endpoints, a shared API Gateway is utilized, and inter-microservice communication is facilitated through the Feign client. The application incorporates service discovery and circuit breaker patterns, and it incorporates security recommendations from OWASP. Additionally, Spring Batch is employed for loading the initial data into the database. Test classes are created for the unit testing.
Installing DynamoDB Local
To install DynamoDB local, follow these steps:
Download the DynamoDB local package:
- Visit the AWS DynamoDB local downloads page (https://docs.aws.amazon.com/amazondynamodb/latest/developerguide/DynamoDBLocal.DownloadingAndRunning.html).
- Choose the appropriate package for your operating system (e.g., Windows, Linux, macOS).
- Download the package to your local machine.
Extract the downloaded package:
- Locate the downloaded package file and extract its contents to a directory of your choice.
Start DynamoDB local:
- Open a terminal or command prompt window.
- Navigate to the directory where you extracted the DynamoDB local package.
- Execute the appropriate command based on your operating system:
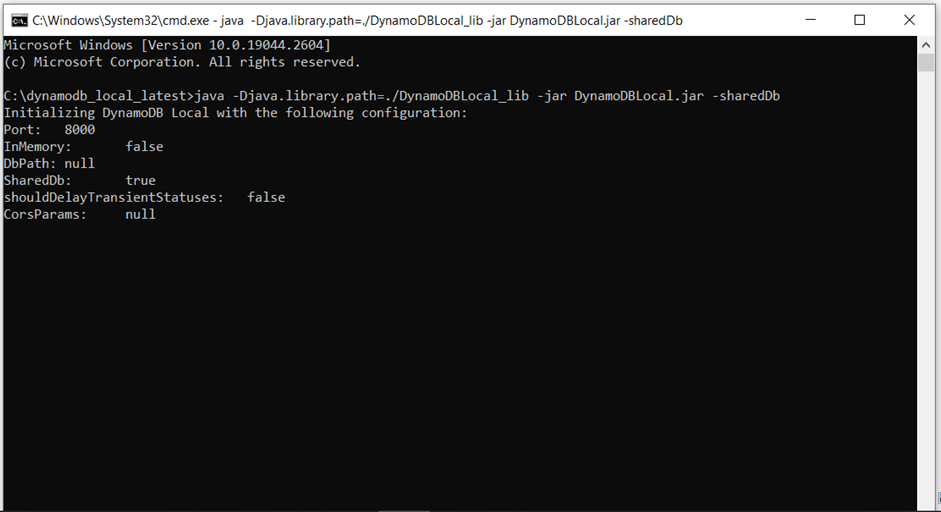
- Windows:
java -D"java.library.path=./DynamoDBLocal_lib" -jar DynamoDBLocal.jar -sharedDb - Linux/macOS:
java -Djava.library.path=./DynamoDBLocal_lib -jar DynamoDBLocal.jar -sharedDb
- Windows:
DynamoDB local should now be running on your machine. It emulates the functionality of the AWS DynamoDB service, but operates locally on your system.
We will be using AWS CLI to create tables in the DynamoDB database. Here are the steps to install AWS CLI:
Installing AWS CLI
Visit the AWS Command Line Interface official page:
- Go to the official AWS CLI page at https://aws.amazon.com/cli/.
- Scroll down and locate the "Install the AWS CLI on Windows" section.
Download the AWS CLI Windows installer:
- Click on the "Download the AWS CLI version for Windows" link.
- This will download the Windows installer package (an executable file with a
.msiextension) to your computer.
Run the AWS CLI installer:
- Locate the downloaded
.msiinstaller file and double-click on it to start the installation process. - If prompted, choose "Yes" or "Run" to allow the installer to make changes to your computer.
- Locate the downloaded
Select installation options:
- In the AWS CLI Setup wizard, click "Next" to proceed.
- Read and accept the terms of the AWS CLI License Agreement, then click "Next".
- Choose the installation location for the AWS CLI or keep the default location, and click "Next".
- Select the desired components to install (e.g., AWS CLI, AWS CLI bundles, AWS Documentation), and click "Next".
Configure the AWS CLI:
- In the "Configure AWS CLI" screen, you have the option to configure the AWS CLI with your AWS credentials.
- If you already have your AWS Access Key ID and Secret Access Key, select the "Configure AWS CLI" checkbox and enter your credentials.
- Alternatively, you can choose to configure the AWS CLI later manually by running the
aws configurecommand in the command prompt.
Complete the installation:
- Once you have made the necessary configuration choices, click "Next" to proceed.
- Review the summary of your installation choices and click "Install" to begin the installation process.
Wait for the installation to finish:
- The installer will now install the AWS CLI and any selected components.
- Once the installation is complete, click "Finish" to exit the installer.
Verify the installation:
- Open a new command prompt window.
- Run the command
aws --versionto verify that the AWS CLI has been successfully installed. - The command should display the version of the AWS CLI installed on your system.
C:\Users\mail2>Aws --version
aws-cli/2.11.20 Python/3.11.3 Windows/10 exe/AMD64 prompt/off
Now you have the AWS CLI installed on your Windows machine, and you can use it to interact with various AWS services via the command line. Remember to configure your AWS credentials using the
aws configure command before using the AWS CLI to access your AWS resources.Configuring credentials:
C:\Users\mail2>aws configure
AWS Access Key ID [None]: dummyid
AWS Secret Access Key [None]: dummypw
Default region name [None]: us-east-1
Default output format [None]: json
Creating Tables in DynamoDB
We will be creating three tables - user, restaurant, searchrestaurant and review
Create json files with configuration to create these tables:
create-table-user.json
This table would have email as the key to store users information.
{
    "TableName": "user",
    "KeySchema": [
      { "AttributeName": "email", "KeyType": "HASH" }
    ],
    "AttributeDefinitions": [
      { "AttributeName": "email", "AttributeType": "S" }
    ],
    "ProvisionedThroughput": {
      "ReadCapacityUnits": 5,
      "WriteCapacityUnits": 5
    }
} create-table-restaurant.json
This table would contain restaurant's information
{
    "TableName": "restaurant",
    "KeySchema": [
      { "AttributeName": "restaurantName", "KeyType": "HASH" }
    ],
    "AttributeDefinitions": [
      { "AttributeName": "restaurantName", "AttributeType": "S" }
    ],
    "ProvisionedThroughput": {
      "ReadCapacityUnits": 5,
      "WriteCapacityUnits": 5
    }
} create-table-review.json
This table would contain latest average reviews for the items.
{
    "TableName": "review",
    "KeySchema": [
      { "AttributeName": "reviewId", "KeyType": "HASH" }
    ],
    "AttributeDefinitions": [
      { "AttributeName": "reviewId", "AttributeType": "S" }
    ],
    "ProvisionedThroughput": {
      "ReadCapacityUnits": 5,
      "WriteCapacityUnits": 5
    }
} create-table-searchrestaurant.json
This table would be used for search operations:
{
    "TableName": "searchrestaurant",
    "KeySchema": [
      { "AttributeName": "restaurantName", "KeyType": "HASH" }
    ],
    "AttributeDefinitions": [
      { "AttributeName": "restaurantName", "AttributeType": "S" }
    ],
    "ProvisionedThroughput": {
      "ReadCapacityUnits": 5,
      "WriteCapacityUnits": 5
    }
} Create the above four tables in the DynamoDB database by executing the commands:
C:\Users\mail2>aws dynamodb create-table --cli-input-json file://create-table-user.json --endpoint-url http://localhost:8000
{
    "TableDescription": {
        "AttributeDefinitions": [
            {
                "AttributeName": "email",
                "AttributeType": "S"
            }
        ],
        "TableName": "user",
        "KeySchema": [
            {
                "AttributeName": "email",
                "KeyType": "HASH"
            }
        ],
        "TableStatus": "ACTIVE",
        "CreationDateTime": "2023-05-31T11:21:59.321000-04:00",
        "ProvisionedThroughput": {
            "LastIncreaseDateTime": "1969-12-31T19:00:00-05:00",
            "LastDecreaseDateTime": "1969-12-31T19:00:00-05:00",
            "NumberOfDecreasesToday": 0,
            "ReadCapacityUnits": 5,
            "WriteCapacityUnits": 5
        },
        "TableSizeBytes": 0,
        "ItemCount": 0,
        "TableArn": "arn:aws:dynamodb:ddblocal:000000000000:table/user"
    }
}C:\Users\mail2>aws dynamodb create-table --cli-input-json file://create-table-restaurant.json --endpoint-url http://localhost:8000
{
"TableDescription": {
"AttributeDefinitions": [
{
"AttributeName": "restaurantName",
"AttributeType": "S"
}
],
"TableName": "restaurant",
"KeySchema": [
{
"AttributeName": "restaurantName",
"KeyType": "HASH"
}
],
"TableStatus": "ACTIVE",
"CreationDateTime": "2023-06-14T09:44:51.925000-04:00",
"ProvisionedThroughput": {
"LastIncreaseDateTime": "1969-12-31T19:00:00-05:00",
"LastDecreaseDateTime": "1969-12-31T19:00:00-05:00",
"NumberOfDecreasesToday": 0,
"ReadCapacityUnits": 5,
"WriteCapacityUnits": 5
},
"TableSizeBytes": 0,
"ItemCount": 0,
"TableArn": "arn:aws:dynamodb:ddblocal:000000000000:table/restaurant"
}
}C:\Users\mail2>aws dynamodb create-table --cli-input-json file://create-table-searchrestaurant.json --endpoint-url http://localhost:8000
{
"TableDescription": {
"AttributeDefinitions": [
{
"AttributeName": "restaurantName",
"AttributeType": "S"
}
],
"TableName": "searchrestaurant",
"KeySchema": [
{
"AttributeName": "restaurantName",
"KeyType": "HASH"
}
],
"TableStatus": "ACTIVE",
"CreationDateTime": "2023-06-14T09:44:59.709000-04:00",
"ProvisionedThroughput": {
"LastIncreaseDateTime": "1969-12-31T19:00:00-05:00",
"LastDecreaseDateTime": "1969-12-31T19:00:00-05:00",
"NumberOfDecreasesToday": 0,
"ReadCapacityUnits": 5,
"WriteCapacityUnits": 5
},
"TableSizeBytes": 0,
"ItemCount": 0,
"TableArn": "arn:aws:dynamodb:ddblocal:000000000000:table/searchrestaurant"
}
}C:\Users\mail2>aws dynamodb create-table --cli-input-json file://create-table-review.json --endpoint-url http://localhost:8000
{
"TableDescription": {
"AttributeDefinitions": [
{
"AttributeName": "reviewId",
"AttributeType": "S"
}
],
"TableName": "review",
"KeySchema": [
{
"AttributeName": "reviewId",
"KeyType": "HASH"
}
],
"TableStatus": "ACTIVE",
"CreationDateTime": "2023-06-14T09:45:41.125000-04:00",
"ProvisionedThroughput": {
"LastIncreaseDateTime": "1969-12-31T19:00:00-05:00",
"LastDecreaseDateTime": "1969-12-31T19:00:00-05:00",
"NumberOfDecreasesToday": 0,
"ReadCapacityUnits": 5,
"WriteCapacityUnits": 5
},
"TableSizeBytes": 0,
"ItemCount": 0,
"TableArn": "arn:aws:dynamodb:ddblocal:000000000000:table/review"
}
}
Checking the tables created
C:\Users\mail2>aws dynamodb list-tables --endpoint-url http://localhost:8000
{
    "TableNames": [
        "restaurant",
        "review",
        "searchrestaurant",
        "user"
    ]
}Setting Up RabbitMQ
To set up RabbitMQ on a Windows computer, you can follow these steps:
Download RabbitMQ:
Go to the RabbitMQ website at https://www.rabbitmq.com/download.html.
Under the "Windows" section, click on the "Installer for Windows" link to download the RabbitMQ installer.
Install RabbitMQ:
Run the RabbitMQ installer and follow the on-screen instructions to install RabbitMQ on your Windows computer.
Start RabbitMQ:
Once the installation is complete, you can start RabbitMQ by going to the Windows Start menu, finding the RabbitMQ folder, and selecting the "RabbitMQ Command Prompt" option.
In the RabbitMQ Command Prompt window, type the following command to start the RabbitMQ server:
rabbitmq-server start
Access RabbitMQ Management Console:
RabbitMQ provides a web-based management console for administration purposes. To access the management console, open a web browser and go to http://localhost:15672/.
The default username and password for the management console are "guest". You can log in using these credentials.


In the next part we will be creating the microservices and setting up the Service discovery and API Gateway
Complete Source Code:
https://github.com/it-code-lab/restaurant
Leave a Comment